Fig. 4a Fig. 4b
STEP ONE: THE CROSS
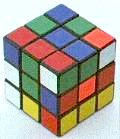
This solution to Rubik's Cube begins, as many solutions do, with the formation of a cross on one face of the cube. You can choose any color but it is best to choose a face which already has an edge piece matching the center color of that face. The scrambled cube shown in Fig. 4a has three faces for which this is true. I have chosen the blue face but any one of the three could have been chosen. (On my cube, red is opposite orange, yellow is opposite green and white is opposite blue.)
Fig. 4a
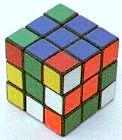
Fig. 4b
Naturally it would be better if two edge pieces had their blue color on top but only if these two pieces are in the proper position relative to each other. More often than not this is not true and one edge piece would have to be changed. In two trials out of three, two will not be better than one.
What is the best way to transform the cube to the one in Fig. 4b? Many solutions would tell you to begin by turning the top (blue) face one turn (90o) clockwise. The blue/green piece would move into its proper place on the cube. These solutions emphasize the bottom face. Target edge pieces are taken to the bottom of the cube, the bottom is turned and the target piece brought to the top in proper position and orientation. That approach would require eight moves to form the cross on the blue face of this cube.
But it is better to emphasize the top face. Edge pieces are moved to the top face so as to be in the proper relationship to top edge piece(s) already on the top face. First, examine the cube. The blue/green edge piece is already on the top face; the blue/red piece is at front/right; the blue/yellow piece is at bottom/front; and the blue/orange piece is at back/bottom.
The blue/yellow piece must be opposite the blue/green piece. In addition, the blue/red piece belongs where the green/orange piece is now. If the blue face is rotated 90o counterclockwise then a 90o clockwise rotation of the orange face will move the blue/red edge piece into place relative to the blue/green piece and a 180o rotation of the green face moves the blue/yellow piece into place, also relative to the blue/green piece.
Three edge pieces are in place on the blue face. We can now rotate the blue face by 180o and then the yellow face by 90o clockwise. Unfortunately this moves the blue/yellow edge piece out of position. After the blue/orange piece is moved into position/orientation by a 90o counterclockwise rotation of the orange face, the blue/yellow edge piece is moved back into place by a 90o counterclockwise rotation of the yellow face. This approach required seven moves.
But it is still better to anticipate. The first move should have been a 90o counterclockwise rotation of the yellow face. This moves the blue/orange edge piece into position so that, following placement of the blue/red and blue/yellow edge pieces, a clockwise rotation of the red face moves the blue/orange piece into its proper position/orientation relative to the other three. Finally, a 180o rotation of the blue face moves all blue edge pieces into place. This approach requires six moves. In standard notation the moves are (back is B):
B' T' R F2 L T2
In actual practice, of course, how you proceed to form the cross is up to you. Just make sure that you can do it somehow. With sufficient practice you should be able to reduce the average number of moves required to about seven.